# Chapter 2 - Process: Routing Documents
# 2.1) General
The process or workflow for a given type of document is defined in State documents. Contained in these documents are all rules / process related definitions.
State documents are categorized first by version, then by form (process) and finally by state. The current workflow version for a given process is stored in the active Language document. When that version value is changed, newly created workflow documents will follow the new State documents while those already in the process will follow the previous ones. Also stored in the Language document are the actual Notes form names which correspond to the Form Names (an alias) that the user sees.
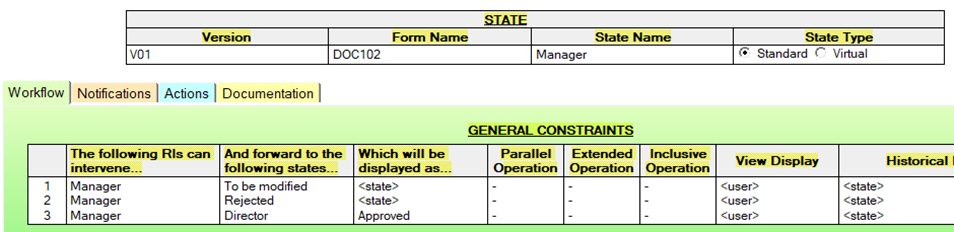
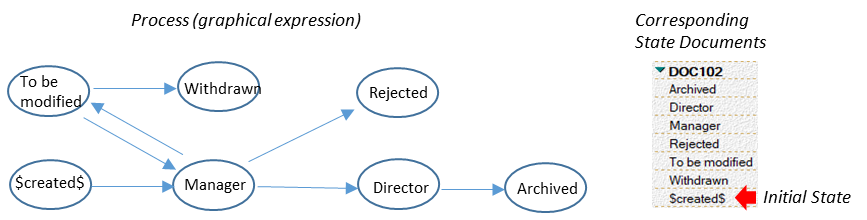
Workflow States are connected by Current State -- Next State relationships. Detailed in each State document, these relationships define the paths of the workflow. In the example above, if the user selects the option Approved (followed by the Send button) in state Manager, the document will be routed to state Director.
The following sections demonstrate some of the many ways to route documents. What is not addressed is how specific users are designated as being those responsible to intervene at a given state. This is discussed in detail in Chapter 3 - Constraints: Specifying Users. Note that the applications referenced here are configured with sample users (available in the default configuration for download):
a1/Horizon
blue/Horizon
Etc.
Additional Notes / References
Video: 2.1 Navigating the Interface
# 2.2) Simple Document Routing
Purpose
Simple Document Routing is when there is only one next state defined from the current state. This is typically the case when a user submits an initial request to be approved by a manager. In that scenario, the user selects the Send button and the document advances to that state. In the Notes client, no choices are presented to the end user and the document advances directly.
What it looks like


How to make it happen

[*] in the initial state indicates that any user with access to the database can create a document of this type.
$created$ is a reserved word and always refers to the initial state in a process.
Additional Notes / References
Video: 2.2 Simple Document Routing
Application: WAApplication01.nsf, Process DOC101
# 2.3) Manual Document Routing
Purpose
Manual Document Routing indicates that the user is given a choice as to where to advance the document. The user selects the desired option from the drop down list followed by the Send button. The workflow document is then forwarded accordingly. In the Notes client, the user first selects the button Send, upon which a dialog box is presented from which to make the selection.
What it looks like


How to make it happen

Additional Notes / References
Video: 2.3 Manual Document Routing
Application: WAApplication01.nsf, Process DOC102
# 2.4) Automatic Document Routing
Purpose
Automatic Routing advances a document in the workflow according to a set of predefined rules. What we have seen up to this point in time are Manual Rules which allow the user to select the next state. Upon selecting the Send button, Workflow Ascendant automatically determines the next document state and advances it based on the conditions defined in the State document evaluated against values stored in the workflow document.
What it looks like


How to make it happen
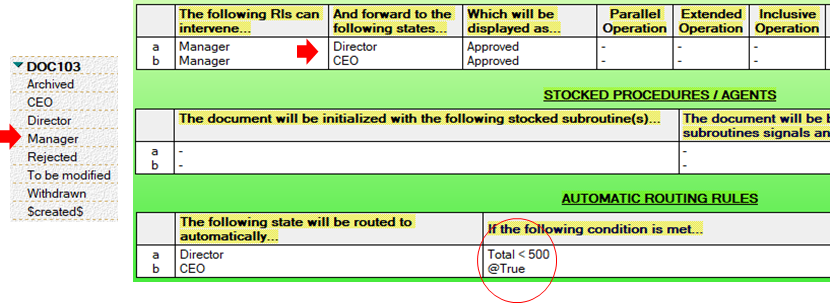
The last frame to the right directly above forms an If-Then, If-Then, ...Else statement (exactly like the @If command) and are evaluated from top to bottom. The last entry in this list must always be @True (the default condition). Automatic rules must always have the same display name per responsible individual (in this case Approved).
Additional Notes / References
Video: 2.4 Automatic Document Routing
Application: WAApplication01.nsf, Process DOC103
# 2.5) Manual and Automatic Document Routing
Purpose
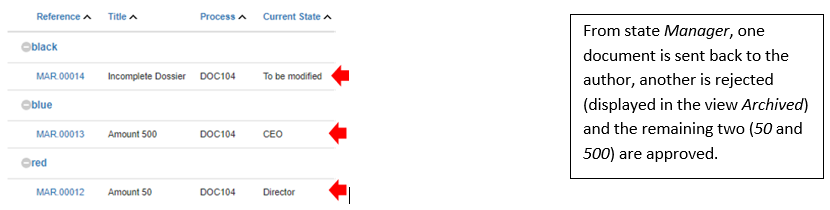
Manual and automatic rules can be combined in the same state. A classic example of this is a manager who may send a request back to the author, reject the request or approve it. In the latter case however, the document may take a different path depending on the amount of the request. If the amount is less than or equal to, say, 500, the document will be sent to a Director. If, however, the amount exceeds 500, it will be sent to the CEO. In the corresponding State document, the first two rules will be manual, the last two rules automatic.
What it looks like

How to make it happen
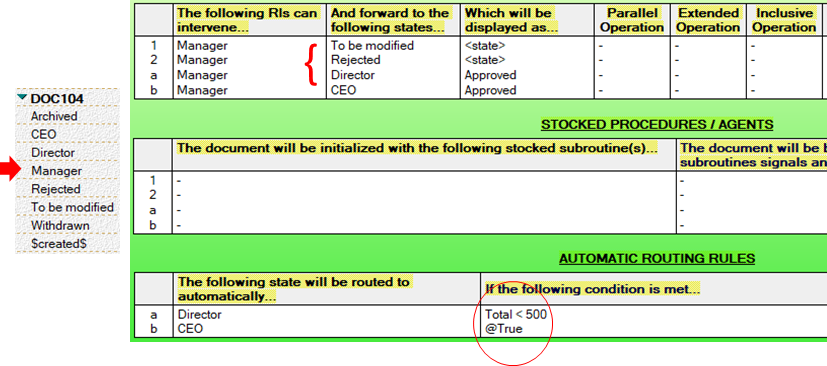
Note that manual rules have numbers (1 and 2 here) while automatic rules have letters (a and b here).
Additional Notes / References
Video: 2.5 Manual and Automatic Document Routing
Application: WAApplication01.nsf, Process DOC104
# 2.6) Selective Operations
Purpose
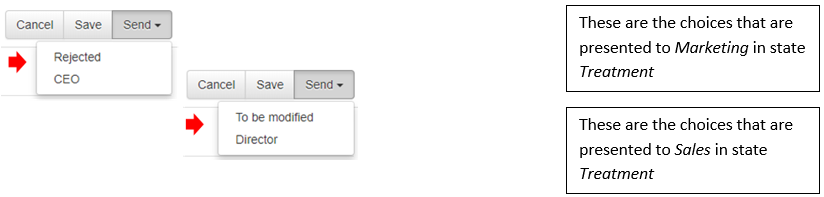
Different constraints (discussed in Chapter 3) can be combined within the same state. When this occurs, users only see the next states associated with their constraints. This is often referred to as Next State Visibility. The easiest way to understand this is in the context of an example.
What it looks like
How to make it happen

Note that in this example, any user from Marketing or Sales is sufficient to advance the document to a different state.
Additional Notes / References
Video: 2.6 Selective Operations
Application: WAApplication01.nsf, Process DOC105
# 2.7) Parallel Operations
Purpose
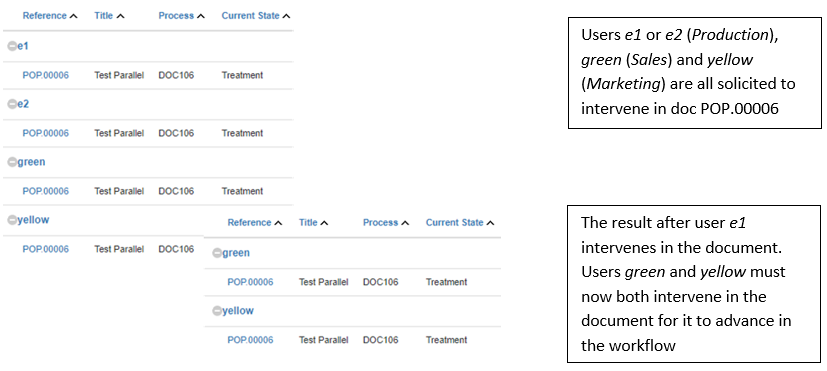
There are times in a process where multiple individuals must intervene in a given state before the document can be advanced. In the previous examples only one authorized user is sufficient to advance those documents in the workflow. A process that requires that an individual from multiple different groups (roles or fields) must intervene at a given point in time is referred to as a Parallel Operation. A process that requires that all individuals from a particular group (role or field) must intervene at a point in time is referred to as an Inclusive Operation (described in the following section). These operations can, of course, be combined in the same state.
What it looks like
How to make it happen

Note that in a parallel operation, users can intervene in any order.
Additional Notes / References
Video: 2.7 Parallel Operations
Application: WAApplication01.nsf, Process DOC106
# 2.8) Inclusive Operations
Purpose
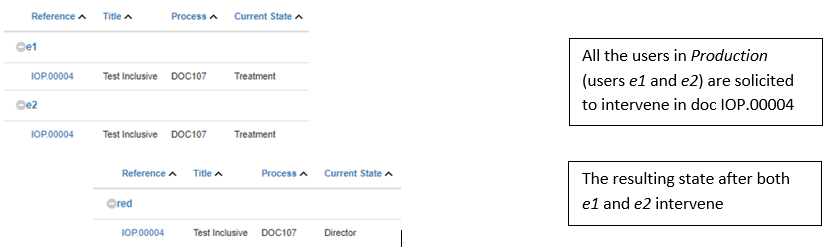
There are times in a process where multiple individuals must intervene in a given state before the document can be advanced. The previous section Parallel Operations treated the case where an individual from multiple different groups must intervene at a point in time. This section treats the case where all individuals from a particular group must intervene at a given point in time -- referred to as an Inclusive Operation. These operations can, of course, be combined within the same state.
What it looks like
How to make it happen

As with parallel operations, users can intervene in any order in an inclusive operation. Note that if you intervene as the database manager, the document will advance regardless of who else has intervened prior!
Additional Notes / References
Video: 2.8 Inclusive Operations
Application: WAApplication01.nsf, Process DOC107
# 2.9) Parallel and Inclusive Operations
Purpose
Parallel Operations and Inclusive Operations can be defined in the same state and even in the same rule. For a description of each, reference the previous two sections.
What it looks like
How to make it happen

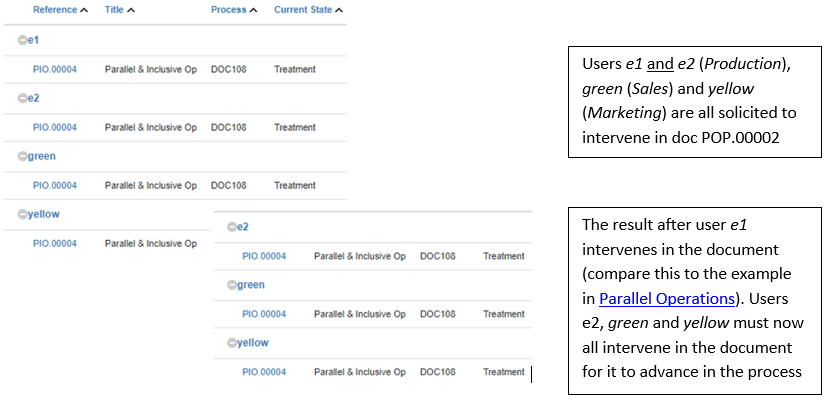
In the above example, all users in Production and any one user from Marketing and any one user from Sales must intervene (in any order) at state Treatment for the document to advance..
Additional Notes / References
Video: 2.9 Parallel and Inclusive Operations
Application: WAApplication01.nsf, Process DOC108
# 2.10) Extended Parallel Operations
Purpose
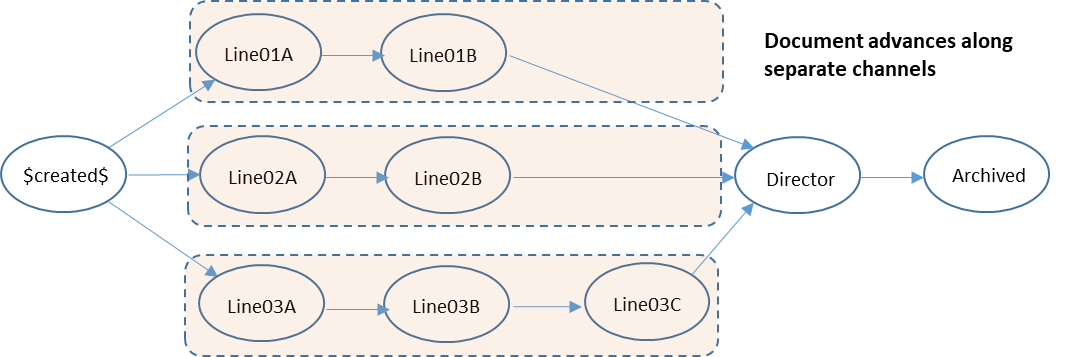
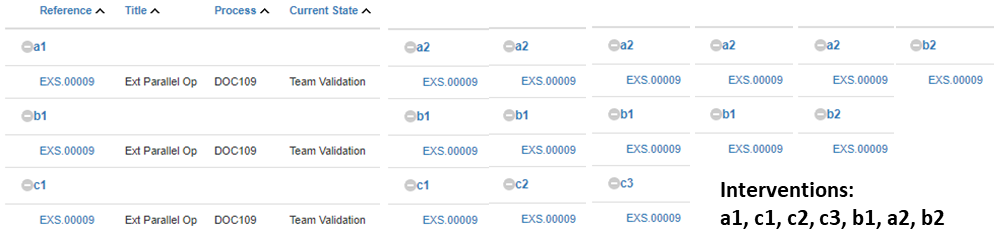
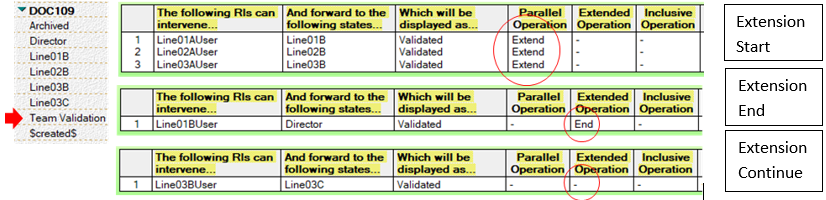
Extended States "extend" the scope of a parallel operation. In a standard parallel operation, an actor from each of the different constraints (i.e., roles) must intervene for the document to advance. An extended parallel state, however, allows a document to advance along separate channels in parallel. The easiest way to understand this concept is in terms of the above graphic. The workflow document can advance from Line02A to Line02B without, for example, waiting for Line01A to advance to Line01B and Line03A to advance to Line03B (or any combination therein). The document only advances to Director, however, after the designated user(s) have all intervened in Line01B, Line02B and Line03C.
What it looks like
How to make it happen
Additional Notes / References
Video: 2.10 Extended Parallel Operations
Application: WAApplication01.nsf, Process DOC109
# 2.11) Extended Sequential Operations
Purpose
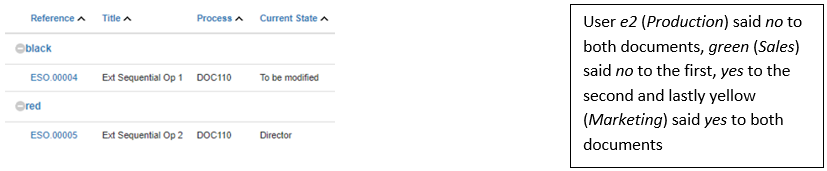
Extended Sequential Operations refer to the ability to "fuse" two states together. Prior examples have all looked at how one person advances a document in the process from one state to the next. Even in the case where multiple users intervene in parallel, it is always the last person who selects the Send button who determines the next state. What if, however, the next state depends on the collective opinion of a group of users? In this case we need to make use of what we refer to as a Virtual State. When a document advances to a Virtual State, the rules of that state are executed immediately -- effectively chaining two levels of rules together, one after the other.
What it looks like
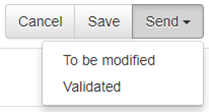
In process DOC110, Marketing, Sales and Production are all solicited to intervene in documents at state Treatment, each being presented with the above choices. The business logic is that at least two of the three entities must validate the document for it to advance to the Director (otherwise it is sent back to the author for modification).
How to make it happen
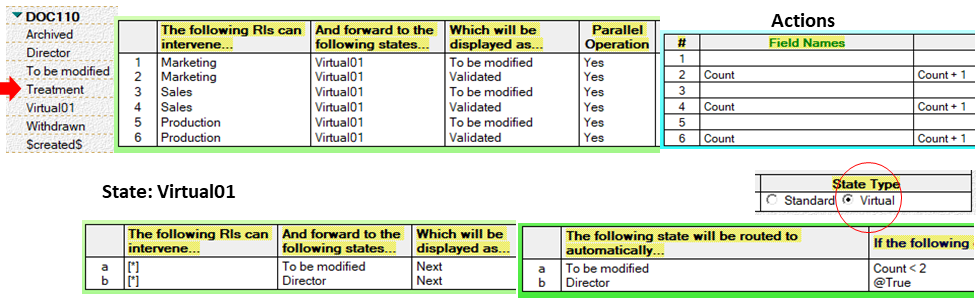
Each time Validated is selected in state Treatment, field Count is incremented by 1 in the document. When the document advances to Virtual01, the automatic rules are executed immediately and route the doc based on Count.
Additional Notes / References
Action definitions are contained on the third tab of a State document and explained in Section 2.14.
Video: 2.11 Extended Sequential Operations
Application: WAApplication01.nsf, Process DOC110
# 2.12) Child Documents
Purpose
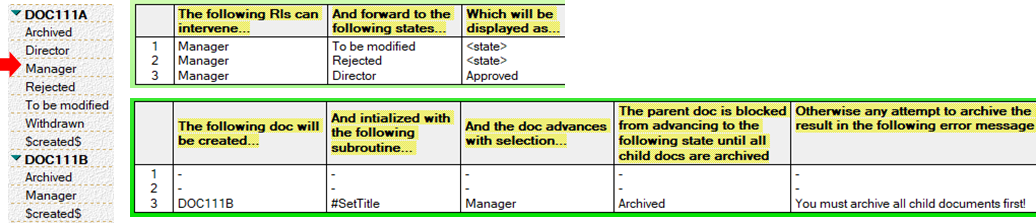
Child documents are documents which are created from a parent document. Workflow Ascendant can manage a hierarchy of these documents. Examples might include: a Purchase Request, which can lead to (or create) one or more Purchase Orders, which can lead to (or create) one or more Delivery Tickets. At document creation, each of these child documents subsequently follows its own process / set of State documents.
What it looks like


How to make it happen

Additional Notes / References
The use of invoked routines (#SetTitle in the example above) is explained in Section 4.2. Note that you will normally want to hide the direct creation of a child document, an option which you can select in the Language document.
Video: 2.12 Child Documents
Application: WAApplication01.nsf, Processes DOC111A, DOC111B
# 2.13) Email Notifications
Purpose
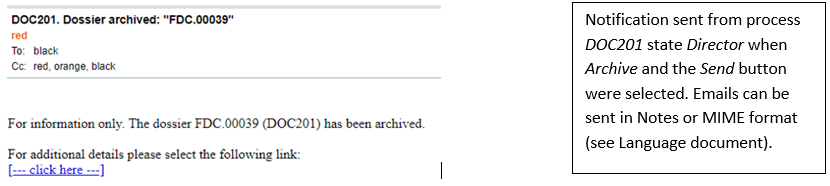
Email notifications are typically sent when a document is advanced in the workflow. These messages can be personalized for each rule or "path" in State documents which include the: To, Cc, Bcc, Subject and Body fields. Default values are used from the active Language document for any fields left blank. A link back to the pertinent workflow document is automatically included at the end of each email notification.
What it looks like
How to make it happen

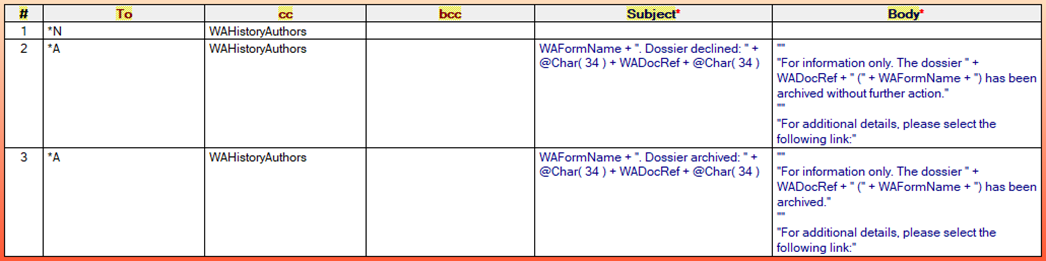
Workflow Ascendant interprets the Subject and Body fields which contain executable Notes @Formula language code. The latter of these is of multi-line format where each line represents an executable statement. In the address fields (To, cc, bcc), you can specify multiple values (one per line) mixing any of the following formats:
*N -- indicates the next individuals slated to intervene in the document
*A -- indicates the document author
Specific user names or group names (from the Notes Directory)
Field names (which in turn must contain valid user names or group names)
Additional Notes / References
Video: 2.13 Notifications
Application: WAApplication02.nsf, Process DOC201
# 2.14) Actions
Purpose
The Actions tab in the State document contains definitions to set fields in the workflow document. When the Send button in the workflow document is selected, as part of the executed designated rule, fields are updated according to those definitions. The specific example contained herein addresses how these definitions can be used to dedicate specific (comment) fields in the workflow document for each contributor in the process.
What it looks like

How to make it happen
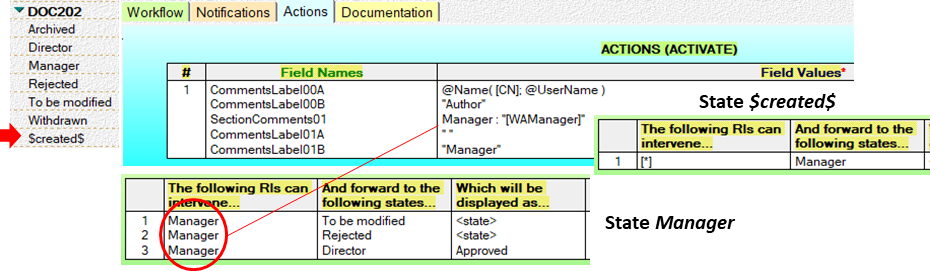
Field names on the left are updated with executable @Formula statements which are interpreted on the right (one per line). In this specific example where the handling of comments is the object, the reserved field names are as follows (where # corresponds to a row in the Comments table):
CommentsLabel#A -- The user name to be displayed
CommentsLabel#B -- The user role to be displayed
SectionComments# -- The users (Constraint) that are authorized to modify the comments field for that row
Additional Notes / References
Reference Appendix C for the most commonly used @Formulas used in State documents.
Video: 2.14 Actions
Application: WAApplication02.nsf, Process DOC202
# 2.15) Historical Text
Purpose
The History tab of each workflow document details each intervention along with the number of days the document has remained with that user. The text description by default is set to the name of the next state but can be customized. Each time an individual selects the Send button, Workflow Ascendant adds a line to a table in that document in the tab entitled Historical:
The user name
The date the user advanced the document in the workflow
A text description of what his or her action represents
What it looks like
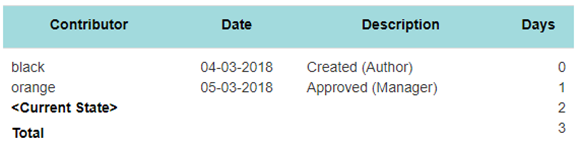
DOC202 at state Director subsequent to the document being created by black and approved by Manager orange.
How to make it happen

Process DOC202 state Director with personalized historical descriptions.
Additional Notes / References
Note that you will typically not want to add an historical entry in the case of a Virtual State, which you specify as part of the State document definitions.
Video: 2.15 Historical Text
Application: WAApplication02.nsf, Process DOC202
# 2.16) Document References
Purpose
Workflow Ascendant provides for the automatic allocation of unique and sequential references to workflow docs. Virtually all processes require this in order to ensure the unique identity of a document and that no document is lost. With respect to the latter, you should always archive your workflow documents as opposed to deleting them. Reference documents are defined by version and process version in view Workflow -- References.
What it looks like

How to make it happen

Reference document DOC202. In this example, the next workflow document forwarded from state $created$ to any other state will be assigned the prefix ROC followed by a text number of length 5 (filled with leading 0s) with the next number in the sequence (19) to be allocated: ROC.00019.
Additional Notes / References
If you deploy your application on multiple servers, you will need to specify which server will allocate this unique reference in the Language document.
Video: 2.16 Document References
Application: WAApplication02.nsf, Process DOC202
# 2.17) Alert Timeouts
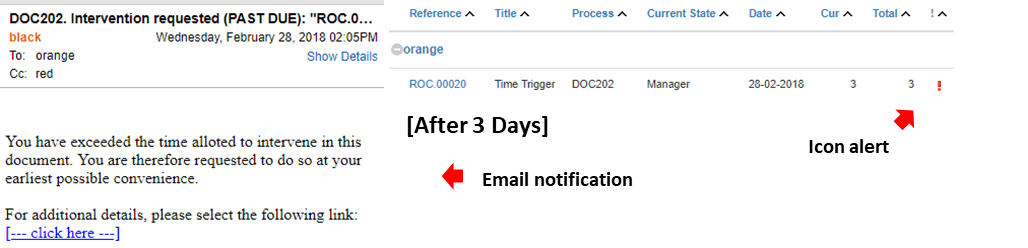
Purpose
Emails can be sent and alerts displayed if users do not intervene in a designated amount of time. These are defined in Time Trigger documents in the Workflow -- Time Triggers view. In this example (DOC202), an email is sent to Manager (cc to Director) and an alert displayed when the document remains in state Manager for 3 days.
What it looks like
How to make it happen


Additional Notes / References
For testing purposes, you can simulate the passage of time using the controls displayed in the Admin view of the General Web Interface.
Video: 2.17 Alert Timeouts
Application: WAApplication02.nsf, Process DOC202
# 2.18) Time Based Routing
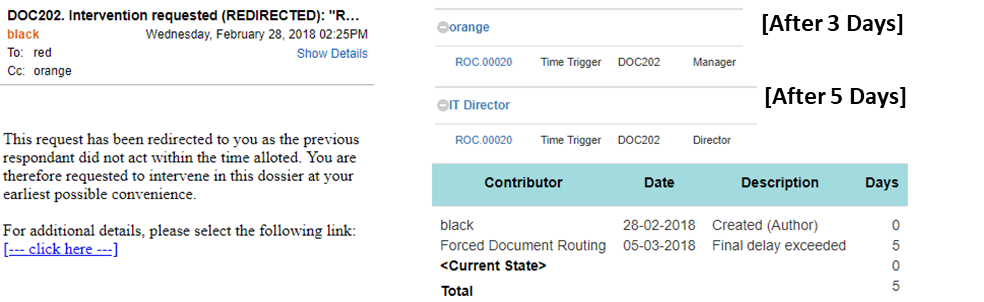
Purpose
Workflow documents can be automatically routed based on elapsedtime. These are defined in Time Trigger documents in the Workflow - Time Triggers view. In this example (DOC202), the document is routed to Director when Manager does not intervene with the allotted 5 day window. Multiple Time Trigger documents can be assigned to the same state.
What it looks like
How to make it happen


Additional Notes / References
For testing purposes, you can simulate the passage of time using the controls displayed in the Admin view of the General Web Interface.
Video: 2.18 Time Based Routing
Application: WAApplication02.nsf, Process DOC202